一种通过利用腾讯云 SDK 自动更新 CDN 域名中 SSL 证书的解决方案。
全球各大证书权威签发机构已停止签发免费的有效期超过 1 年的 SSL 证书,而腾讯云的内容分发不支持对域名证书自动续期,所以如果更新证书变得有那么一丝丝的麻烦。而另外一个原因则是商用泛域名证书太贵了,免费的泛域名证书目前有 Let's Encrypt 等。幸运的是腾讯云几乎所有的操作都有可供调用的 API,更新内容分发的 CDN 证书也是不在话下。
更新日志
2021/08/20 初始化文章:《腾讯云 CDN 证书自部署方案》。
泛域名证书获取
有两种方案:一是利用面板的 SSL 证书模块,自助组合泛域名证书,申请成功后通过定时任务定期检查更新;另一个是利用 acme.sh ,独立的进行证书申请,自行处理证书文件。
利用面板进行自动化证书获取
1Panel 面板可在「网站-证书」进行自动化申请更新操作。
利用 ACME 获取证书
An ACME Shell script: acme.sh,你可以参考 acmesh-official/acme.sh 仓库使用。
泛域名证书部署
接下来就需要部署证书至腾讯云 CDN,此部分采用 Node 版本。
首先自行安装 Node 环境,接着在合适的目录中创建 index.js 和 domain.json 文件,然后替换 index.js 中 secretId 和 secretKey 值。接着在 domain.json 文件中,你需要参考下列格式写入 CDN 加速域名和证书所在路径。最后在该目录下安装腾讯云开发者工具套件(SDK)。
{"domain": "inkss.cn", "certPath": "/opt/program/ssl/inkss"}
|
npm install tencentcloud-sdk-nodejs --save
|
const fs = require("fs");
const path = require("path");
const CdnClient = require("tencentcloud-sdk-nodejs").cdn.v20180606.Client;
const Client = new CdnClient({
credential: {
secretId: "xxxxxxxxxxxxxxxxxxxxxxxxxxxxxxxxx",
secretKey: "xxxxxxxxxxxxxxxxxxxxxxxxxxxxxxxxx"
},
profile: {
httpProfile: {
endpoint: "cdn.tencentcloudapi.com"
}
}
});
const lastModifiedFile = 'lastModified.json';
let lastModifiedDates = {};
if (fs.existsSync(lastModifiedFile)) {
const jsonString = fs.readFileSync(lastModifiedFile, 'utf8');
lastModifiedDates = JSON.parse(jsonString);
}
function genParam(domain, certPath) {
let cert, key;
try {
cert = fs.readFileSync(certPath + "/fullchain.pem", 'utf-8');
key = fs.readFileSync(certPath + "/privkey.pem", 'utf-8');
} catch (err) {
console.error(`读取证书或私钥失败: ${err}`);
return null;
}
const currentDate = new Date().toLocaleString("zh-CN", {timeZone: "Asia/Shanghai"});
return {
"Domain": domain,
"Https": {
"Switch": "on",
"Http2": "on",
"OcspStapling": "on",
"Hsts": {
"Switch": "on",
"MaxAge": 31536000
},
"CertInfo": {
"Certificate": cert,
"PrivateKey": key,
"Message": `证书最后更新时间:${currentDate}`
}
}
};
}
function deployCert(domain, certPath) {
return new Promise(async (resolve, reject) => {
const params = genParam(domain, certPath);
if (!params) {
console.error(`无法生成配置参数,跳过域名【${domain}】的更新。`);
resolve();
return;
}
try {
await Client.UpdateDomainConfig(params);
console.log(`域名 【${domain}】 更新证书完成。`);
resolve();
} catch (err) {
console.error(`域名 【${domain}】 更新失败: ${err}`);
reject(err);
}
});
}
const jsonFilePath = process.argv[2];
let domainsAndPaths;
try {
const jsonString = fs.readFileSync(jsonFilePath, 'utf8');
domainsAndPaths = JSON.parse(jsonString);
} catch (err) {
console.error(`域名配置文件读取失败:${err}`);
process.exit(1);
}
const promises = domainsAndPaths.map(({ domain, certPath }) => {
const certFilePath = path.join(certPath, "/fullchain.pem");
const stats = fs.statSync(certFilePath);
const lastModifiedDate = stats.mtime.toISOString();
if (!lastModifiedDates[domain] || lastModifiedDates[domain] !== lastModifiedDate) {
lastModifiedDates[domain] = lastModifiedDate;
return deployCert(domain, certPath);
} else {
console.log(`证书未改变,域名【${domain}】无需更新。`);
return Promise.resolve();
}
});
Promise.all(promises).then(() => {
fs.writeFileSync(lastModifiedFile, JSON.stringify(lastModifiedDates));
}).catch(err => {
console.error(`更新证书过程中出现错误: ${err}`);
});
|
[
  {
    "domain": "your_domain_here",
    "certPath": "/your_cert_path_here"
  },
  {
    "domain": "another_domain_here",
    "certPath": "/another_cert_path_here"
  }
]
|
利用定时任务自动更新
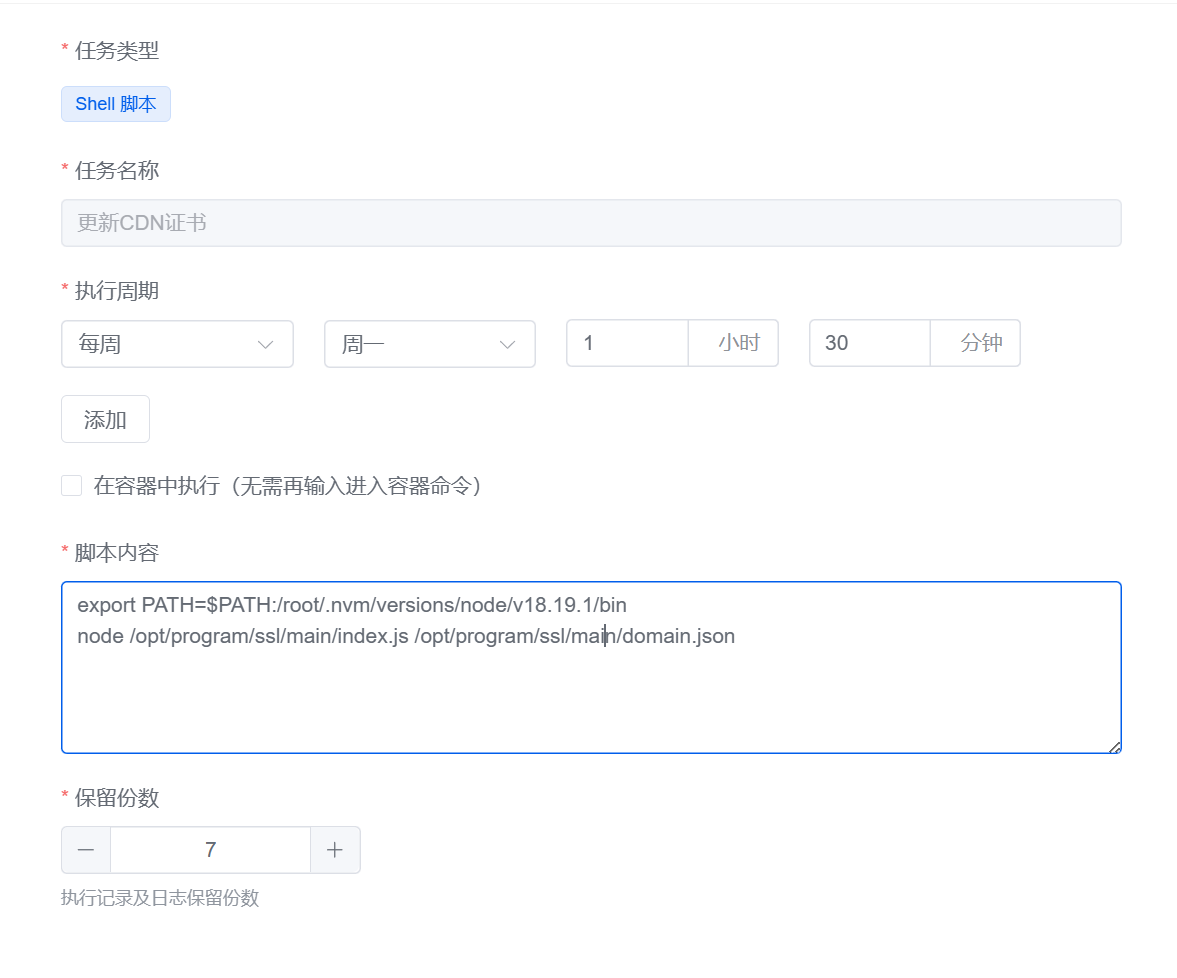
在 1Panel 面板计划任务处新建 Shell 脚本,脚本参考内容:
export PATH=$PATH:/root/.nvm/versions/node/v18.19.1/bin
node /opt/program/ssl/main/index.js /opt/program/ssl/main/domain.json
|
脚本执行周期任意,只需要满足 90 天内至少运行一次即可:


